Monday, December 19, 2011

Secret Santa Stout: The labels

One last thing before we put a bow on Secret Santa Stout. It needs a label.

We had a funny idea to take a picture of me in a Santa costume, putting my finger to my lips in a "Shhhh..." gesture. We took the picture in front of the Christmas tree for extra effect. Then I bought a set of Avery shipping labels and we printed it out. Wasn't too difficult overall, although my wife did all the work. Maybe it was really hard, I don't know. That's why I outsource these things.

Anyway, that's the story of Secret Santa Stout. It's an excellent beer, and I'm happy to have been able to share it with you. That does it for this series of blog posts, but we'll be back whenever the next batch starts up.

Merry Christmas!

Wednesday, December 14, 2011

Secret Santa Stout: Tasting!


As it happened, my good friend Bob was over on the day that Secret Santa Stout was ready to taste. I chilled two bottles in the fridge for a couple of hours, and then poured them, as you see above. The carbonation was dead on.

I'll be straight with you: this beer is awesome.

It poured black, with a toasted brown colored head, and a cascading effect like that of Guinness. The first thing I noticed was a subtle but unmistakable scent of vanilla, giving way to a malty sweetness that was underlined, not overpowered, by the oaked bourbon. The finish was roasty and coffee-like. This beer has a decent amount of hops and no small amount of alcohol, but neither of those flavors stands out. It's all about the interplay of the malts, with the vanilla, oak, and bourbon flavors highlighting it all.

I'm very happy with how Secret Santa Stout turned out. This is a big step up from my first batch, which I credit equally to the recipe and to the experience that I had under my belt. My sanitation was more thorough this time around, no curveballs caught me unaware, and I had the patience to let the fermentation run its course. I'd still call myself a novice, for sure, but this has bolstered my confidence in a big way. I am already starting to think about what I'll do next.

But I have some unfinished business first. Since Secret Santa Stout is a Christmas gift, I can't just hand off some plain old bottles. I need to make labels!


Monday, December 12, 2011

Secret Santa Stout: Bottling


Bottling was so uneventful that I almost forgot to write about it! Which is not to say that nothing happened. It's just that bottling is a tedious process, with none of the joy and discover of the boil or the fermentation.

First, I boiled 3/4 cup of corn sugar in 1 pint of water, and let it cool to room temperature. I put this syrup in my cleaned and sanitized bottling bucket (which had doubled, earlier, as my primary fermenter). Then the anti-fun began. We siphoned the beer from the secondary fermenter into the bottling bucket. I have an auto-siphon, a nifty little device that aims to take the guesswork out of the process. It's easy: you stick it into your beer, pump the insert once or twice, and then watch it go. All you really have to do is keep track of the end of your siphon hose, making sure it stays in place and doesn't splash.

This worked pretty well (splashed a little), but it seemed to be taking even longer than usual. Eventually I noticed that a massive air bubble was stuck in the siphon hose. It was about a foot long, and a thin stream of beer was trying its damndest to circumnavigate it. I gave the auto-siphon another pump and the bubble cleared, which sped up the flow by about three times, but also splashed vigorously.

When you read about homebrewing, the importance of sanitation is the number-one thing they warn you about, but not a distant number two is the important of not aerating your beer after you pitch the yeast. Oxidation in your beer is the same chemical process as oxidation of metal, better known as rust. It's best to avoid that. So I was a little bummed at the splashing but it didn't seem bad.

Once the beer had been transferred to the bottling bucket and mixed with the sugar syrup, it was time to bottle. Here again I have an invaluable tool, a bottle filler, which attaches to the end of the siphon hose. It has a spring-loaded gadget at the end which holds the beer in the tube until you press it against the bottom of the bottle, at which time it gently starts the flow. As I learned, though, you need to start your siphoning with the bottle filler open, or else you build up a huge air bubble, which leads to more splashing.

Overall it went well. Due to technical difficulties, two of my bottles ended up being aerated pretty badly -- I marked those caps with an X. (The rest I marked "S3," on my wife's suggestion.) And I ended up with 47 full bottles and one about halfway full, which was just about the target yield -- and a far cry from the 8-Bit Ale, when I had to dump half the batch thanks to a snafu with my bottles.

Between sanitizing, bottling, and cleaning up, the entire process took about an hour and a half. Not bad at all, although, again, much less enjoyable than most of the other parts of the process. And it led to the worst part of all: waiting for the carbonation to be done. I would have to wait about two weeks to drink my first Secret Santa Stout.

Friday, December 9, 2011

Secret Santa Stout: Fermentation, stage 2

Here's what I don't think I understand about sanitization. Because I had never used my carboy before, I gave it a good overnight soaking in a bleach solution, and stuck my siphon tube in there for good measure. Of course, it wasn't full all the way to the top, and I only realized afterward that I probably should have done that. A good couple of inches of the glass were sitting there, unsanitized, and only made contact with the bleach solution with a little swirling and brushing. Now, I understand that the point of sanitizing your equipment is to reduce the number of potential contaminants to an insignificant level, and that it will never be 100%, but it seems to me like even reaching 90% is a lofty goal for the homebrewer.

No matter. Last time I was grabbing unsanitized equipment and plunging it straight into the wort, and everything came out all right.

At any rate, I sanitized my carboy, my stopper, my siphon hose, and my auto-siphon, and prepared to rack my beer. At this point I added the boubon-soaked oak chips and two vanilla beans, cut in half lengthwise. I had planned to put all of these things in a muslin bag so I wouldn't have to worry about filtering them out, but there was no way we could have fit it through the carboy's narrow opening. Instead, I added the wood chips and the beans loose. I am not too worried about the filtering process. My siphon has a small filter that wouldn't be able to hack very small particles, but won't have a problem with wood chips.

Rather than lug my primary upstairs, rack it in the kitchen, and then lug my secondary back downstairs, I decided to do it all in the basement. I brought in a small table and set my bucket on it. What's good about the bucket is how tightly it seals; what's bad about the bucket is how hard it is to unseal. Somehow, I ended up cracking the lid when I pulled it off. I'll need a new one for my next brew.

The brew looked as expected inside the bucket. There was a thick ring of cocoa-like krausen around the perimeter of the bucket a few inches about the surface of the liquid, but the fermenting beer itself looked calm, though cloudy. It smelled terrific -- sweet and coffee-like. It looked good, too, a glossy black color.

We siphoned it into the carboy without incident. There was a tiny bit of splashing at the end, when it ran dry inside the primary, but otherwise the process was quiet. A half-inch-thick layer of caramel-colored yeast sediment remained at the bottom of the bucket. That's always fun to clean out.

I also took a hydrometer reading, and found that the fermentation is mostly done. The starting gravity was 1.080, and at this stage measured 1.028. With a target gravity of 1.020-1.026, it was nearly there. But it needed time not only to ferment, but to steep in the wood and vanilla. I didn't want to oak it for too long -- I've read that can backfire -- so as soon as I got consistent hydrometer readings I planned to bottle it

More important, though, it tasted great! I was surprised. My 8-Bit Ale has tasted decent at the same point in the process, but this was delicious: already complex, roasty and malty, with a strongly alcoholic tang. I could only imagine what it would taste like with proper time to condition, let alone the new flavors I'd be introducing.

With a little over a month to go until Christmas, I was feeling good about the future of Secret Santa Stout.

Wednesday, December 7, 2011

Secret Santa Stout: Fermentation, stage 1

For my first homebrew, I did a single-stage fermentation. I am doing a two-stage fermentation this time, for a couple of reasons. One is that the recipe demands it: the second stage involves steeping some more ingredients in the beer. Another is that I'd like to give this brew a little more time to ferment, and I'd like to get it away from the yeast cake for that. Lastly, I have a whole carboy I've never used. Isn't that reason enough?

The first stage was expected to take 3-5 days, until the most vigorous fermentation had subsided and the krausen had fallen to the bottom of the bucket. After 24 hours, all was going well. The beer was bubbling away, belching a bubble through the fermentation lock every few seconds.

After 48 hours, this had happened:


Apparently I had a blow-out -- fortunately, a minor one.

Asking around on the internet, I found that this isn't a rare occurrence for a stout, because there are so many sugars for the yeasts to feast on. And it wasn't disastrous by any means, although I worried what it had done to the efficacy of the airlock. I had no choice but to rinse, sanitize, and hastily re-attach the lock. It was still bubbling away, so I hoped for the best. I was surprised that such a large bucket didn't have enough headroom for this beer, but it's a lesson learned. Next time I will use a blow-off tube.

The best part about this episode was realizing how much less stressed out I am this time around. Had this happened with my first batch, I would have sworn, stomped around the room, and possibly dumped it. This time, I just shrugged and figured I would roll with it. The more that I read about homebrewing, the more I get the impression that things mostly go right, even when they don't. You read a lot of experienced homebrewers who talk about the importance of doing everything right, and freely admit all the times they've done things wrong and lived to tell the tale.

Was the blow-out suboptimal? Sure. Was it a disaster? I'm betting not. It certainly wouldn't stop me from moving onto the second stage of fermentation.

Monday, December 5, 2011

Secret Santa Stout: Pitching the yeast

You may remember that in my first brew, I had an issue with my wort cooling down too fast, which other homebrewers on the internet told me was a problem they would kill to have. But it was odd all the same. My wort cooled to 58 degrees in a matter of minutes, which is sub-optimal for yeast, but ultimately not a problem.

Rather than doing anything different this time, I went with the assumption that I had, in fact, done something wrong the last time. I repeated the same steps, hoping for a different result, which I understand is the mark of sanity. (Did I get that wrong?) When the boil was done, I put the pot in a sink full of cool, but not cold, water, and stirred it occasionally to try to let more heat escape. The water in the sink heated up almost immediately, which was not a surprise but was fun all the same.


In the meantime, I added 3.5 gallons of cold water to my primary fermenter, a 7.8-gallon bucket. When the temperature of the wort was down to about 140 degrees, I poured it into the bucket as well and stirred both to aerate and to cool the mixture. Within a few minutes, I had a reading of about 75 degrees. Perfect. I also had a liquid yeast this time, instead of the dry yeast I had last time, so instead of activating it, I simply had to shake the vial and then dump it into the wort.

Next, it was time for the first specific gravity reading. I have trouble with this, because the liquid in the flask is always frothy, and I can't see the line on the hydrometer. After a few minutes, we ascertained an initial reading of 1.076, at 72-degrees. That equates roughly to a reading of 1.080 at 60 degrees, which is what the hydrometer is keyed to, and dead on target for the recipe. If you recall how all this went the last time, you'll agree that things were going much more smoothly for Santa.

I closed the lid on the bucket, attached a fermentation lock, and set it in the basement. Nothing to do but sit back and let those yeasts do their work. And if you're thinking that all of this seems a little too good to be true -- you're right!

Friday, December 2, 2011

Secret Santa Stout: The boil

Let me say first that having a successful brew under my belt made a huge difference in my attitude toward the second one. When I started brewing 8-Bit Ale, I was so keyed up that I couldn't even focus. I don't know why; it's just how I am. I was so desperate for everything to go right that I was ensuring that it wouldn't. Having had that experience, I approached Secret Santa Stout with a comparatively Buddha-like calmness.

This recipe doesn't ask for anything more advanced, technique-wise, than the last one. It just has a lot more ingredients. The whole thing starts with the steeping of some grains. The included grains -- chocolate malt, Munich malt, and roasted barley -- needed to be cracked before use. I poured them, little by little, into a large plastic freezer bag, and then attacked them with a rolling pin. Charlie Papazian recommends not pulverizing the grains. You're just looking to breach the husks. It was hard to tell how I did on this score, because there were plenty of fine particles left over, but no reason to sweat it.

When all of them were cracked, I tied them into a (very heavy) muslin bag. I poured the flaked oats into another muslin bag and tied it off. Then I filled my brew pot with two gallons of water and added the grains. I turned on the heat, and brought it up to temperature. I never did replace the broken thermometer from the last time, so I'm still using a meat thermometer to measure the temperature of my water. I'm not sure how accurate the reading is, since it only goes a few inches into the water, but I tried to stir the water around the bags occasionally in order to evenly distribute the water. When the reading reached 150 degrees F, I turned off the heat, covered the pot, and steeped for 30 minutes.


After that, I was supposed to add the malt extracts and the Galena hops, but we realized we needed some things at the grocery store -- in particular, a replacement thermometer. See, our digital thermometer went bonkers, giving readings in both Fahrenheit and Celsius, and refusing to turn off. In attempting to open up the battery compartment, we ended up breaking the whole thing. So it was off to the store. I removed the grains from the pot first, but let the tea sit on the stove, covered, for another 30 minutes or so until we got back.

At that point, I added the malt and the boiling hops. Unlike last time, I used a dry malt extract instead of a syrup. Dry was definitely easier to work with, since I didn't have all the prep work of soaking it in hot water and then spooning it out. But it did form big, sticky clumps in the water that took a few minutes of heating to dissolve. I have no idea how dry extracts compare to syrups in terms of the finished product, but as a lazy homebrewer I will say that I definitely prefer the powdered version.


As before, I'm using pre-measured hop pellets, not whole hops. Not much to say there. You just cut open the plastic package and dump them in. Couldn't be easier. After boiling with the Galena hops for 45 minutes, I added the Golding hops for the final 15 minutes. Although I chose this recipe for its maltiness, I was surprised to realize that it's actually much hoppier than the amber ale I brewed last winter. Doubly so, in fact -- 3 ounces, compared to 1.5! That's part of the reason I'm so excited about the recipe. There's a lot more going on.

After an uneventful boil, the step was one that had caused me much frustration the last time: cooling the wort and pitching the yeast. Would I have learned my lesson?

Wednesday, November 30, 2011

Secret Santa Stout: The ingredients

Deciding to brew Secret Santa Stout was the result of a not-terribly-scientific survey of dark, high-gravity beers. After brewing an amber ale for my inaugural batch, I knew I wanted to go darker for the second. I've always been a fan of maltier beers, so it made sense to try a porter or a stout. I also wanted to add fresh ingredients this time, whether in the boil or in the fermenter, so I thought about flavors like coffee, chocolate, and vanilla -- or maybe even something daring like cinammon or hot pepper. Ultimately, caution won out, and I stuck with a kit, but one that includes most of what I'm looking for.

Secret Santa Stout is made from the "bourbon vanilla oak stout" kit from Beer and Wine Hobby. The kit includes:
  • 2 lb flaked oats 
  • 1 lb chocolate malt 
  • 1 lb roasted barley 
  • 2 lb Munich malt 
  • 3 lb light dry malt extract 
  • 3 lb dark dry malt extract 
  • 2 lb amber dry malt extract 
  • 2 oz Galena hop pellets 
  • 1 oz Golding hop pellets 
  • 4 oz French oak chips 
  • English ale yeast

Despite being an extract kit, the shipment includes 6 pounds of grains for steeping, which is important. I'm not philosophically opposed to the ease of extracts. I can't see myself ever going to all-grain brewing, or even a partial mash that would require a lauter-tun. That all sounds too much like work to me. But I do want to introduce quality ingredients wherever I can. Two of the key ingredients in the kit's name, the bourbon and the vanilla, are not included, and that's part of what attracted me to the recipe. Anything fresh that I can add will make a big difference.

The recipe required a little prep work prior to the boil. The first thing I had to do was soak the wood chips in bourbon. I put them in a small, airtight container, and poured Knob Creek bourbon to cover (about 300 ml). The wood is to soak for a week. Even after a few days, it's already absorbed a decent amount of liquid. At first the chips were completely submerged, and now the top layer is visibly above the bourbon's surface. This pleases me.

The wood will be used later in the fermenting process to approximate aging the beer in a bourbon casket. First, though, comes the boil.

Monday, November 28, 2011

I'll have a brew Christmas

It is time. After ten months of not brewing, I am once again heeding the call. Homebrew batch 2 has begun.

Frankly, I'm surprised it's taken this long. For all that I bitched and moaned during the brewing of my first beer, it came out pretty well in the end. In fact, just last week I drank the remaining two bottles, which had been aging for over six months. It's true what they say: good things do come to those who wait. The extra time in the cellar had rounded out the ale's flavors, and taken a bit of the sour bite off the finish. For a first effort, it was damn good.

Now I want to do even better. With the holidays coming up, it seemed like the perfect opportunity to brew something bigger and more complex. After considering a few different recipes, I've settled on a bourbon vanilla oak stout, with the ingredients from Beer and Wine Hobby. Not to spoil the surprise, but if you're a relative of mine and not a recovering alcoholic, you'll have a little something special in your stocking this year. I've even selected a Christmas-themed name for my brew: Secret Santa Stout.


I haven't gone overboard: Secret Santa Stout is still an extract brew, just with a few additional steps. I'm steeping a lot more grains this time, going to a two-stage fermentation, and adding some additional flavoring during the fermentation. It's a moderate step up from my first recipe, which feels appropriate given my experience. Just like last time, I'll be chronicling the process in this blog. Expect more dizzying highs and abyssal lows, more self-doubt and misguided confidence, and, above all, more temper tantrums.

Wednesday, February 2, 2011

8-Bit Ale debrief

My first homebrewing project is complete. I've had a few of my 8-Bit Ales by now. Though I look forward to having more, I'd like to let a few of them continue to condition in their bottles over the next few months. I also want to give some away. More and more, I wish I hadn't had to dump so much of it. But that's water, or maybe beer, under the bridge.

What did I learn from this whole process? For one thing, I learned that Charlie Papazian was right. Relax. Don't worry. Have a homebrew. Lots of things went wrong, and I overreacted to every one of them. Somehow, when it was all over with, I still had good beer to drink. Next time, I swear I will be more willing to go with the flow.

It'll help that I now have the answers to so many of the elementary questions that concerned me at the beginning. I'm confident about how to sanitize my equipment. I won't stress my hydrometer readings, or my wort temperatures, quite as much. I know what kinds of caps I need for my bottles. (Okay, I am still a little mad about that one.) I can concentrate on the recipe.

At times, I doubted that I would ever undertake another homebrew, but now I can't imagine not doing so. There's a sense of pride that comes from sipping a delicious beer of your own design, and a sense of fulfillment that comes from having crates full of them in your basement. The next one will still be a malt extract brew, but I'd like to get a little bit more ambitious with the recipe. I'm thinking a porter sounds tasty.

That wraps it up for now. Whenever I start homebrew batch #2, I'll be sure to chronicle it right here. And the next batch will be even better, because a Second Draft is always an improvement.

Monday, January 31, 2011

Beer!

Judgment day. 11 days after bottling, it was time to crack open my first 8-Bit Ale. I worried. Of course I worried. What might have gone wrong in the interim? None of the bottles had exploded, which was a positive sign that meant the beer hadn't over-carbonated -- but it could also have meant that the beer under-carbonated! Nope, I can't stop worrying for a second.

But I was encouraged by the first pour.

The ale built up a nice head: white, foamy, substantial. And it didn't dominate the glass. Within a few minutes, it had receded a bit, and held that form until I started drinking it.

In appearance, the beer was as promised, an amber ale. Slightly hazy and golden, it appeared free of sediment and rich in color.

I spent a few minutes peering into my mug, holding it up to the light, and smelling it. But there's no substitute for the real thing. Time for the first sip.

And it was... good! Not mind-blowing. But good. It's drier and more bitter than I had expected, and, if I'm using the term right, bready. Drinkable and refreshing, I'd compare it to Brooklyn Summer Ale. I wish the finish had a little more body. Overall, though, I'm happy with how it came out.

Now I really wish I hadn't had to throw half of it away.

Wednesday, January 26, 2011

Capsized

Look, I know I get frustrated about small things. Instead of stepping back and acting rational when something doesn't work right, I drop F-bombs. Patience is not one of my virtues. Still, it's gotten me this far.

Despite all that had happened in the course of homebrewing, when I probably overreacted to some things that may not have really gone wrong, here I was, bottling away, thinking that soon I'd have an enormous quantity of beer to drink that I had made myself.

Well, I'm not sure what happened, exactly, and if it's anybody's fault, it's the fault of the folks at Beer and Wine Hobby in Woburn, MA, whom I previously described as "fine."

Remember how my homebrewing kit was a gift? When I opened it, I remember my in-laws mentioning something about a mix-up with the bottles. As a result, Beer and Wine Hobby had replaced a box of 12-ounce bottles with a box of 22-ounce bottles for no charge. Fine with me, considering that I didn't have to pay for any of it in the first place, and I will always drink 22 ounces of beer over 12 ounces if given the choice.

First, I filled and capped my smaller bottles. This worked great. It took me a few seconds to realize that the bottle capper took a little more force than I'd expected, but within minutes my 12-ounce bottles were capped and looking superb.

When I placed a cap on my first 22-ounce bottle, I realized something was wrong. It didn't fit. It didn't come close to fitting.

So I got angry. My saint of a wife started looking things up on the internet. She discovered that you can actually cap a 22-ounce bottle with these caps and this capper, but it requires reversing some plates on the capper. We couldn't find any instructions for doing this, save for a cheery "It's an easy adjustment!"

It was not an easy adjustment. It took ten minutes of improvising a chisel out of a flathead screwdriver and hammering away at it. Maybe this doesn't sound like a big deal to you, but when I use any kind of tool it's about as dangerous as Nicolas Cage running around with that glass ball of nerve gas in The Rock. You don't want to be anywhere near me.

Only after making the easy adjustment did we realize that the real problem was that these were Belgian bottles, and required corks. Do you think the fine folks at Beer and Wine Hobby in Woburn, MA, supplied corks with their upgraded replacement bottles? No. No they did not. I had several useless caps, and a dozen 22-ounce bottles of beer with nothing to seal them.

I ended up dumping half my beer down the drain. Maybe there could have been some way to improvise a seal on these bottles, but it was getting late and I was getting disheartened. I wondered -- not for the first time, nor the last -- whether homebrewing was worth it.

There would only be one way to answer that question. I had 24 bottles of 8-Bit Ale left. After bottling, they needed to sit for 10-14 days. Nothing to do, once again, but wait.

Monday, January 24, 2011

Keep it bottled up

The next day, I took another hydrometer reading. This time, it read 1.014, which was almost what I wanted to see before bottling. There were two other factors to consider:
  • Starting gravity had been high enough that my delta was already bigger than the recipe called for.
  • If I didn't bottle that day, I wasn't sure when I'd have a chance to.
Time to bottle!

I sanitized my bottles in the dishwasher, because my dishwasher does have a sanitize setting, and I read on the internet that you can do that. Also, the thought of sanitizing them all by hand made me want to run to the liquor store.

The downside was that this actually took a lot longer than I expected, something like an hour and a half. As soon as I starting running the dishwasher, I set about hand-sanitizing all the other components I would need. And then the Patriots-Jets game was on. I ended up leaving everything out for a couple of hours, worrying the whole time whether they were attracting wild yeasts.

At the time, I thought that this hours-long hiatus could potentially be the worst thing that could happen during bottling. I was wrong.

Boiling the bottle caps

The next few steps were easy to follow. I boiled my bottle caps for five minutes, then removed them with a skimmer. Next, I dissolved 3/4 cup priming sugar in 8 oz water. Finally, I poured the syrup into my bottling bucket and prepared to siphon.

I don't know how most people siphon, but I got an "Auto-Siphon" with my kit that impressed me as much as any basic technology I can remember since the first time I saw carbon paper. I stuck that thing into my fermentation bucket, gave it a pump, and out came a steady stream of beer. The book and the directions had advised against splashing. I didn't even have to try not to. The siphon was gentle as a summer breeze.


Siphoning from the fermenter (top) to the bottling bucket (bottom)

Once the majority of the wort had been transferred to the bottling bucket, leaving only about a half-inch or so of mostly sediment,* it was onto the next step. Here, again, I owed a big assist to my equipment. I had a bottle filler, which was an implement that attached to one end of the siphon. I inserted it into each bottle, pushed it against the bottom, and watched the bottle fill up with no splashing. When I removed the bottle filler, it barely dripped. Even with what little I still know about homebrewing, I would definitely recommend using one of these things.

My bottles were filled and I was ready to cap them. This should have been the easiest part of the whole process. Instead, this was the part that nearly ruined everything.

*The layer of sediment left behind in the fermentation bucket was something to behold. It was a good centimeter-deep layer of greenish-brown sludge. Lots of unsavory analogies came to mind. Sometimes it's better not to know how the sausage is made.

Friday, January 21, 2011

Rest stop

One of the hardest lessons to learn about homebrewing has been how much time you spend doing nothing at all. It's strange, because doing nothing is usually where I shine. After the initial boiling, cooling, and yeast-pitching, all I had to do was kick back for about a week and let those yeasts do their work.

And it was agonizing.

I'd put so much mental and physical preparation into the process, and now I found myself twiddling my thumbs. I felt like I should be doing more. So I padded into the basement several times a day, where I would cross my arms and frown at the fermenter like a concerned parent. "You doing okay in there, little guy? Everything all right?"

After about four days the vigorous bubbling in the fermentation lock had subsided. As that was my only visible sign that anything was happening inside the bucket, I found this distressing. Probably, it was a good thing: when the yeasts had run out of fermentable sugars to consume, they'd settle back at the bottom of the bucket, and my beer would be ready for bottling.

At seven days, I could wait no more. I sanitized my hydrometer and my beaker and prepared to take a sample. Although I struggled a bit with the lid, on account of being a weak-ass man, I was encouraged when the unmistakable smell of beer hit my nostrils. Not even skunked, half-empty-Bud-Lite-can-the-morning-after-a-party beer. Real, fresh beer!

It was hard to tell in the dim basement light, but when I brought my sample back upstairs I found that it looked like beer, too -- a dark, golden honey color. A healthy amount of sediment was still suspended in it, but overall I was encouraged.

The hydrometer reading was encouraging, too. The beer's specific gravity was registering at 1.016, without needing to correct for temperature. That was close to the target! The recipe called for a final gravity of 1.008-1.012. Considering that my initial sample had read much higher than what the the recipe called for, this seemed like a good sign. But it also seemed like I wouldn't lose anything by waiting a day and taking another measurement.

Back into the dark, dry basement it went. I would have to wait another day -- but not before tasting the little bit I'd measured.

Looked like beer, smelled like beer, and tasted like beer, too! It wasn't carbonated, which made for a strange mouthfeel, and it did seem a little tart on the finish, but overall I was optimistic. Or, let's say, "hoptimistic."

On second thought, let's not say that.

Wednesday, January 19, 2011

It's alive!

I couldn't have been more disheartened by the time I had sealed my fermentation bucket. It seemed like everything had gone wrong. Not only were my temperature and my specific gravity incorrect, but I had also freaked out and used a bunch of unsanitized equipment for reasons I can't even remember at this point. (I did at least run the new stuff under hot water for awhile, so, you know, I'm sure it's fine. I'm sorry, Charlie.)

Anything you read about homebrewing will casually tell you to store your fermenting beer in a dark place at 65-70 degrees. As though there aren't any cheap bastards out there who would shiver all day and night under three layers of blankets rather than turn up the heat and pay a slightly higher oil bill. Not that I know anybody like that.

At any rate, room temperature in my home during the winter months is lower than the recommended temperature for fermenting ale. It's about 60 degrees during the day. So I am probably the only homebrewer in history who has fermented his ale in the basement, because it is warmer than the rest of his house. I'm keeping it in the unfinished side of the basement, near the furnace, which is the warmest and driest part of the house right now -- not to mention the darkest.

After the calamity that had befallen the yeast-pitching portion of the brewing process, I was expecting the worst. I checked on my fermentation bucket a few hours after leaving it in the basement and thought I saw some condensation on the inside of the fermentation lock, but didn't know what to make of it. Probably, I thought, the whole thing is a failure.

The next day, first thing I went downstairs to see if anything was happening. I turned on the light and thought I saw something moving in the lock. I crouched and stared at it. Come on. Show me something.

The bucket burped.

Maybe that's not a correct description of what was happening, but it's what it looked like. The fermentation lock is a small plastic container half-filled with water. As I watched it, it continually belched out bubbles, sometimes violently. Those little yeasts were doing their job -- which, as I understand it, is to eat sugar and crap alcohol. This goop might yet turn into beer!

Of course, I still have to bottle it. And nothing so far has scared me as much as that.

Monday, January 17, 2011

Pitching a fit

I don't have any pictures of the next phase of the brewing process, when I took the wort off the heat and pitched my yeast. Why? Well, because it, uh, didn't go so well.

Once again, the instructions I had received with my kit didn't sync up with the advice that Charlie Papazian gives in The Complete Joy of Homebrewing. Earlier, I had disregarded the kit's directions in favor of Papazian's, with success. Maybe it was in the spirit of fair play that, this time, I followed the kit instead of Papazian. Big mistake.

The directions with the kit recommended submerging the stock pot in a bathtub full of cold water when it came off the heat, for 10-15 minutes. I didn't have a bathtub handy, so I filled up my sink about halfway with cold water and stuck the pot in there once the wort was finished boiling. In the meantime, I added three gallons of cold water to my fermentation bucket. Papazian recommended pouring the boiling wort directly into the fermenter, but that sounded crazy!

Note to self: Never doubt Charlie Papazian again.

I was impatient. By 9 minutes, I took the stock pot out of the water and poured the wort into the fermenter. Then I added the remaining gallon and a half or so of water. I had previously added my 15g of yeast to 1/2 cup of lukewarm water to activate it, so all I needed was for the wort to reach the target temperature before I could add it. I was excited, not least because I knew that brewers called this part of the process "pitching the yeast" and I was excited to use the lingo.

"Honey!" I called to my wife. "I'm pitching my yeast!"

As soon as I stick my spoon and hand (I have a small spoon) into the wort to stir vigorously, as the directions advised, I knew something was wrong. You are supposed to pitch your yeast when it's at 70-80 degrees Fahrenheit, but this felt much colder than that.

Previously, I had used the thermometer that came with my brewing kit to measure the hot wort right off the stove. It wasn't sanitized afterward. I sighed and figured I at least ought to wipe it off before using it again. I grabbed a piece of paper towel. The second I touched it to the tip of the thermometer, the thing exploded. The little black spheres inside it -- who knows what they were made of -- spilled all over the counter. I had used this thermometer once, for about five seconds, and now it was broken. At least it didn't blow up in my beer, I guess.

First, I thought a candy thermometer might make a suitable replacement, but it turns out that those don't measure below 100 degrees F. Next I tried a meat thermometer, which read about 57 F, far lower than the 70-80 it was supposed to be. Was the thermometer accurate? I have no idea. But I had no other way to tell.

On the plus side, 60 degrees F is the appropriate temperature to measure your brew's specific gravity, which was the next step in the process, so even if my yeast was fucked, at least this ought to work. The kit also comes with a hydrometer, which I'm pretty sure I last used in eight-grade science class, and I think I hated it then, too. I filled up a beaker with some of my prenatal beer, dropped in the hydrometer, and spun it to dislodge air bubbles, just as the book said.

The directions said that my beer's specific gravity should have measured 1.035-1.040. It measured 1.050.

That's not a little bit off. That's way off. And I didn't need to correct for temperature, either, because the hydrometer was just about zeroed out.

What happened? What went wrong? I have no idea. Nothing bothers me more than when I think I've followed directions, and things don't work out. Granted, I obviously brought the temperature down too fast, but I wouldn't imagined that would have such an outsized effect.

Now, I worried. Would my yeast activate? Should I wait to bottle my brew until it reaches the final specific gravity that the recipe recommends, or until it drops by the amount that the recipe recommends? Again: they don't tell you this stuff.

I had no other choice. I closed the lid on the bucket, attached the fermentation lock, and put the bucket away. I expected the worst.

Friday, January 14, 2011

Wort, me worry?

All things being equal, I thought the first part of brewing my 8-Bit Ale went very well. First, I added 1.5 gallons of water to my 20-quart stock pot. (Tap water, as mentioned in the last post.)

Next, I poured the 1 pound of crystal malt into a muslin bag and knotted it. I dropped it into the stock pot and turned on the heat.

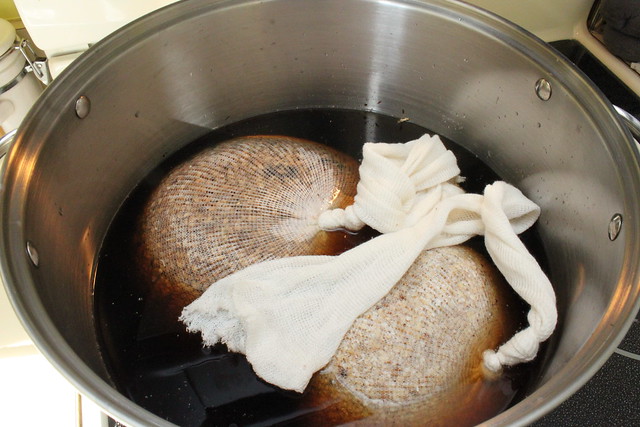
I brought the water to a boil, then removed it from the heat and let the malt steep for five minutes. Apparently you can check the temperature during this part of the process to make sure that you're getting everything right, but, again, I decided not to sweat it.

I was a little worried because the bag was only about halfway submerged in the water, and because lots of fine powder had escaped the bag in the transition from the counter to the pot. But before long, a dark toffee color was seeping from the bag into the water, and a rich sweet smell was permeating the air. The most interesting thing that happened during this step was that the grains started to pop under the heat, almost like popcorn.

While this was going on, I filled the sink with warm water and stuck my cans of malt extract in for a few minutes. Papazian had recommended this as a way to make the syrup easier to work with.

He was right! The stuff was incredibly thick. And sweet, too, as I noticed when I sucked a bit of it off my fingertips.

Next, I removed the grains from the pot, and added the syrup, the hop pellets, and the water salts.

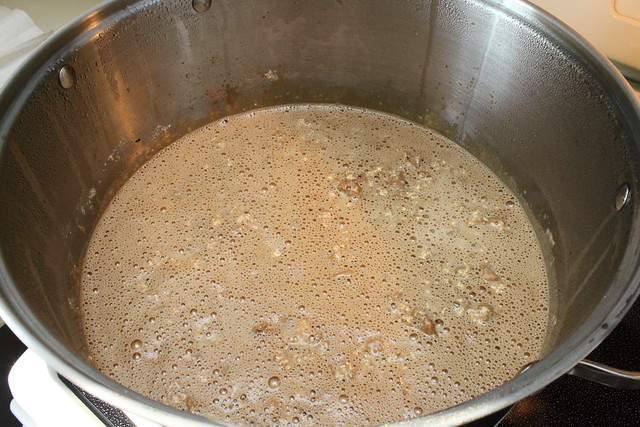
The next stage was time-consuming, but easy. I simply boiled the concoction for 45 minutes. (The instructions I got with the kit said to boil for 30 minutes, but Papazian said 45, and in this case I chose to follow his advice. Later, I would learn that I should always follow his advice.)

During this time, I was blown away by the aroma. The dominant scent was a malty sweetness, girded by an earthy grain odor.

I was surprised by how many visible changes the wort went through while I was boiling it. At first, the hop pellets disintegrated and floated on the surface. After a little while, the wort formed a thick greenish coating that looked like pond scum. Then it disappeared, and for the last half or so of the boiling process the wort took on a deep caramel color.

The questions persisted: What does it mean to boil for 45 minutes? Do I want a violent boil, or more of a simmer? They don't tell you this stuff. For the most part I went with a rolling boil, but it was dangerous. At times, the liquid level surged nearly to the top of the pot, and only judicious stirring and alert heat control prevented it from boiling over.

During this time, I asked my wife to watch over the wort while I attended to some sanitization. I needed to clean my fermentation bucket, the lid, and everything else that would come into contact with the wort once it came off the heat. This wasn't too hard, although, again, I worried about the details. My kit came with something called "C-Brite." I had to mix one packet of it with a gallon of water. Seemed easy enough to do this in my fermentation bucket, and then sanitize the smaller equipment right in there. But what was I supposed to do?

I ended up dunking the equipment in the cleaning solution for several seconds, swishing it around to make sure every bit of the surface was sanitized. Then I rinsed it all under cold tap water and laid it out on paper towel. For the bucket itself, I grabbed some more paper towels that I sloshed into the solution, then up and around the walls of the bucket. I only did the top part of the outside, figuring the beer wouldn't and shouldn't come into contact with much of the bucket's exterior. Maybe this will end up poisoning me.

All told, I was happy with the way this part of the process unfolded. Everything seemed to go right. I added the ingredients at the right time; I sanitized everything, maybe even more than I needed to. So far, my first batch of homebrew was shaping up nicely. I could almost taste the 8-Bit Ale.

And that's when everything started to go wrong.

Wednesday, January 12, 2011

8-Bit Ale brewing begins

In the days leading up to my first attempt at a homebrew, my time was divided thusly:
  • 40% worrying about technique
  • 20% fantasizing about hops and malt
  • 40% thinking of a name for my beer
On the name, at least, I'm pretty confident. I wanted something related to video games, and something that rolled off the tongue. "8-Bit Ale" fit the bill nicely. Seriously, say it out loud. "8-Bit Ale." Good, right? You want to drink it already.

Of course, the recipe I'd be following is one that thousands of other homebrewers had used. It's the one that comes with the homebrewing kit I got for Christmas, which was furnished by the fine folks at Beer and Wine Hobby in Woburn, MA. The kit included most of the equipment I needed. In reading the recipes, and Charlie Papazian's book, it seemed the major component I was missing was a stock pot big enough to boil my wort. The night before I was set to begin, I picked up a 20-quart stainless steel pot from Target, and got ready to brew.

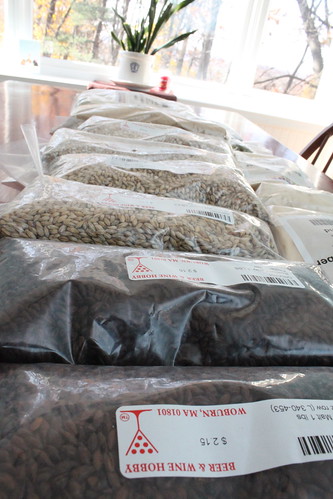
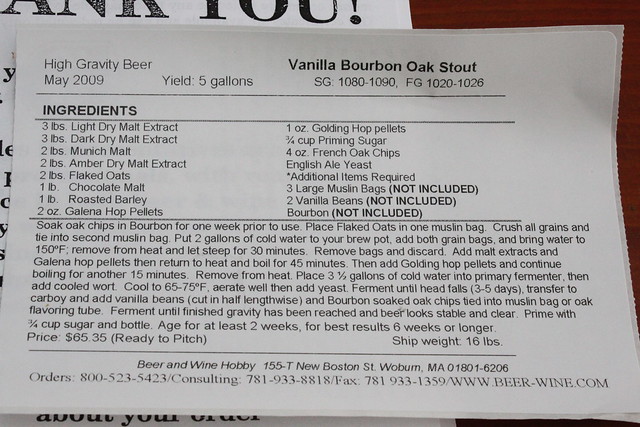
8-Bit Ale was to be an "amber ale," one of three options included in the deluxe homebrewing kit from Beer and Wine Hobby. The ingredients were as follows:
  • 2 cans malt extract (3.3 lbs each)
  • 1 lb crystal malt
  • 1.5 oz Hallertau hop pellets
  • .5 oz water salts
  • 15g yeast
To this, I would need to add 5 gallons of water. Thus began a recurring theme in my homebrewing experience: excessive worrying about possibly trivial things. Apparently master brewers take their water seriously, and make sure that the mineral content of the water is just so in each and every brew they make.

I thought about picking up some filtered water from the store, and I considered trying to filter 5 gallons through my Brita pitcher (which would only have taken about six hours or so), before deciding that I had enough to worry about, so I should use tap water. I mean, come on -- I drink my tap water all the time and I haven't turned into the Toxic Avenger yet. Let's just get started.

But, as I said, questions kept coming up. Remember when you were a kid and you were starting at a new school, there were a million things to think about, but the most important thing you were concerned about was where the bathroom was? That's how I felt when I started my batch of 8-Bit Ale. I was fascinated by the interplay of ingredients, by the chemical reactions that I would be orchestrating, and by the control I could finally exert over the beer that I would drink. When it came to the most basic logistical questions. I was terrified.

I wondered things like:
  • Should I cover the stock pot when it's boiling, or leave it uncovered?
  • How often should I stir it?
  • Where will I sanitize my bucket?
  • If I use the bucket for fermentation, what will I use to bottle?
  • What the hell is "sparging?"
Just as in school, when you finally had to raise your hand and ask for the damn hall pass, eventually I needed to get started. You learn by doing, not by reading the first chapter of The Complete Joy of Homebrewing over and over.

It was time to get started.

Monday, January 10, 2011

Stress out. Worry. Have a homebrew?

I drink too much beer. I suppose it was inevitable that, one day, I would find myself trying to brew beer, as well. For economics alone, homebrewing is hard to beat. Spending just a few dollars, the homebrewer can concoct about 55 beers in a single batch. All it takes is a few hours of effort. There's nothing to it. Or is there?

That's what I intended to find out. This past Christmas, I received a homebrewing kit. Along with all the equipment -- siphon, fermenting bucket, bottle capper -- was a copy of Charlie Papazian's The Complete Joy of Homebrewing. Papazian is a homebrewing guru, basically the Dalai Lama of hopheads. His mantra, which he repeats over and over throughout the book, is:
Relax. Don't worry. Have a homebrew.
Sensible advice, which I completely failed to heed. In the days leading up to my first attempt at homebrewing, I was stressing out. No joke -- I had a nightmare in which my wort boiled over, my bottles exploded, and, worst of all, my beer was awful.

Even before I started, I had to wonder. Is homebrewing worth it? Why bother spending hours brewing beer, and then waiting weeks for it to be ready, when I can head to any corner store, drop a ten-spot, and come home with a six-pack and a decent night ahead of myself?

Hell, if you could explain what drives human beings to achieve anything, then you'd be the first person in history to do it. I had never thought about brewing my own beer until somebody gave me a push in that direction. Suddenly, I could think of nothing else. I imagined what new and unique recipes I'd want to try. I spent too much time thinking of a name for my "brewery." And I envisioned having a cellar full of spectacular brews, which I could hand to friends with a grin and say, "Yeah, I made this."

Off I went into the great unknown. Only one thing remained: to chronicle my first batch of homebrew for all the world to see. I may be stressing, and worrying, but one way or another, I will have a homebrew. Welcome to Second Draft Brewing.